multiprocessing 模組進階篇 - Pipe, Queue, Array, RawArray 以及 Structure 之教學範例
Posted on Aug 7, 2023 in Python 程式設計 - 中階 by Amo Chen ‐ 5 min read
用範例輕鬆學 Python multiprocessing 模組 一文中提到 4 種 IPC(Inter Process Communication)方法,分別是:
- 以參數(args)的方式傳遞資料
- 以共享記憶體(Shared Memory)中的 Value 物件傳遞資料
- 以 fork 方式傳遞資料, fork 出來的子 process 會繼承父 process 的資源,所以可以存取原本父 process 內的資料
- 透過 Manager 共享資料, Manager 會在一個稱為 server process 的 process 中管理共享的資料,並且代理其他 process 操作這些共享資料
除了上述幾種方式之外, Python 也有提供其他方式滿足開發者對於 IPC(Inter Process Communication) 的相關需求,本文將額外介紹 Pipe, Queue, Array, RawArray 4 種方式。
本文環境
- Python 3
Pipe
如果 2 個 Process 之間需要溝通,可以簡單透過 Pipe() 進行, Pipe() 會回傳 2 個 Connection 物件,分別代表管道的 2 端, 2 個 process 各持一端,就能夠進行溝通,如下圖所示 Process A 與 Process B 需要各持 1 個 Connection, 透過該 Connection 發送與接送資料:

以下是 2 個 Processes 使用 Pipe 進行 IPC 的範例:
import os

from multiprocessing import Process, Pipe


def do_job(conn):
    pid = os.getpid()
    while True:
        i = conn.recv()
        if i is None:
           print(f'{pid}| Nothing to do. Exit.', flush=True)
           conn.send(None)
           conn.close()
           break
        print(f'{pid}| Got {i} from the pipe.', flush=True)
        conn.send(i + 5)


if __name__ == '__main__':
    pid = os.getpid()
    conn1, conn2 = Pipe()

    p = Process(target=do_job, args=(conn2, ))
    p.start()

    for i in range(1, 11):
        conn1.send(i)
    conn1.send(None)

    while True:
        result = conn1.recv()
        if result is None:
           conn1.close()
           print(f'{pid}| Close the pipe', flush=True)
           break
        print(f'{pid}| Receive {result} from the pipe', flush=True)
上述範例 conn1, conn2 = Pipe() 取得 2 個 Connection, 並透過 args 的方式將 conn2 指派給子 process, 也就是 p = Process(target=do_job, args=(conn2, )) 接著用 1 個 for 迴圈送了 10 次資料給子 process, 子 process 會在收到資料之後把資料 +5 之後再送回去。
上述範例執行結果如下,可以看到有 2 個不同的 PID 在運作:
7985| Got 1 from the pipe.
7985| Got 2 from the pipe.
7985| Got 3 from the pipe.
7985| Got 4 from the pipe.
7985| Got 5 from the pipe.
7985| Got 6 from the pipe.
7985| Got 7 from the pipe.
7985| Got 8 from the pipe.
7985| Got 9 from the pipe.
7934| Receive 6 from the pipe
7985| Got 10 from the pipe.
7934| Receive 7 from the pipe
7985| Nothing to do. Exit.
7934| Receive 8 from the pipe
7934| Receive 9 from the pipe
7934| Receive 10 from the pipe
7934| Receive 11 from the pipe
7934| Receive 12 from the pipe
7934| Receive 13 from the pipe
7934| Receive 14 from the pipe
7934| Receive 15 from the pipe
7934| Close the pipe
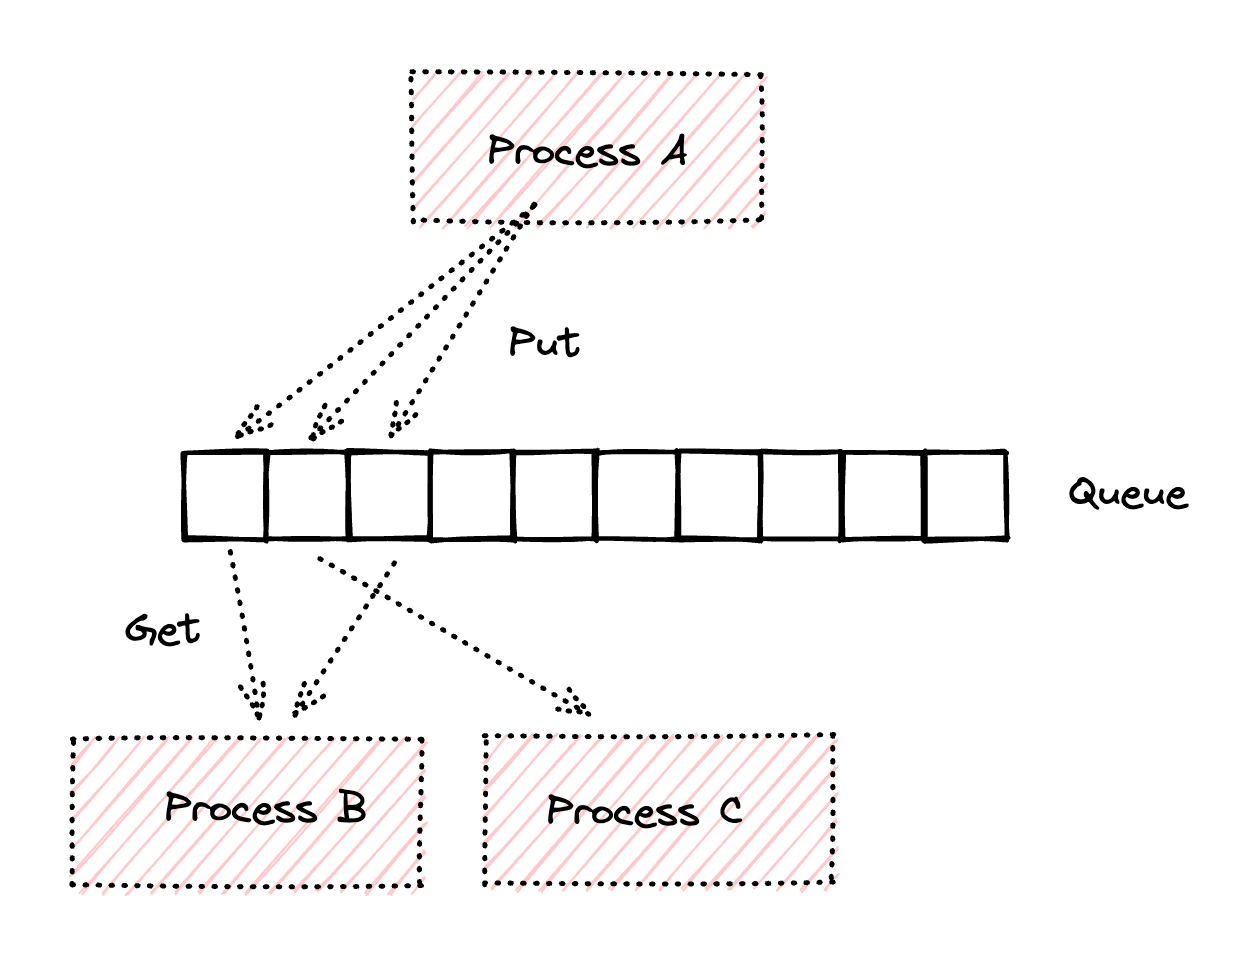
Queue
Queue 是用 Pipe 與 locs/semaphores 實作而成,與 Pipe 不同的是:
- Queue 可以設定 queue size, 預設為無限制
- Queue 可以同時給多個 Processes 存取
下列是使用 Queue 進行 IPC 的範例:
import os

from multiprocessing import Process, Queue


def do_job(queue):
    pid = os.getpid()
    while True:
        data = queue.get()
        if data is None:
           print(f'{pid}| Nothing to do. Exit.', flush=True)
           break
        print(f'{pid}| Got {data} from the queue.', flush=True)


if __name__ == '__main__':
    queue = Queue()

    processes = [
        Process(target=do_job, args=(queue, ))
        for _ in range(2)
    ]

    for p in processes:
        p.start()  # 執行 process

    for i in range(1, 21):
        queue.put(i)  # 放入資料

    queue.put(None)
    queue.put(None)

    for p in processes:
        p.join()  # 等待 process 執行結束
上述範例中 queue = Queue() 取得 1 個 Queue, 接著使用 for 迴圈將 Queue 傳遞給 2 個 Processes, 並使用 for 迴圈將資料放到 Queue 之中,這些資料會在 do_job() 函式中被 queue.get() 取得後列印出來。
值得注意的是 queue.get() 預設為阻塞式(block), Process 會等到 get() 取得資料後,才繼續執行,如果不想讓它阻塞 Process 可以改為 get(false) ,如果無法取得資料,將會拋出 queue.Empty 例外(exception)。
p.s. queue.get() 也可以設定 timeout (單位為秒,必須為正整數)。
前述範例執行結果如下,可以看到 2 個 Processes 都能順利從 Queue 中取得資料:
4394| Got 1 from the queue.
4395| Got 2 from the queue
4394| Got 3 from the queue
4395| Got 4 from the queue
4394| Got 5 from the queue
4395| Got 6 from the queue
4394| Got 7 from the queue
4395| Got 8 from the queue
4394| Got 9 from the queue
4395| Got 10 from the queue
4394| Got 11 from the queue
4395| Got 12 from the queue
4394| Got 13 from the queue
4395| Got 14 from the queue
4394| Got 15 from the queue
4395| Got 16 from the queue
4394| Got 17 from the queue
4395| Got 18 from the queue
4394| Got 19 from the queue
4395| Got 20 from the queue
4394| Nothing to do. Exit.
4395| Nothing to do. Exit.
Array
用範例輕鬆學 Python multiprocessing 模組 一文中我們介紹 Value 的使用方法, Value 僅代表 1 個值,如果需要傳遞多個相同型態(type)的資料,則可以利用 Array, Array 與 Value 相同都可以使用 acquire() , release() 等 Lock 的方法,避免 race condition 的問題發生。
下列是使用 Array 進行 IPC 的範例程式:
import os
import random

from multiprocessing import Process, Array


def do_job(arr):
    pid = os.getpid()
    print(f'{pid}| Got the Array')
    for i in range(len(arr)):
        arr.acquire()
        arr[i] = random.randint(0, 100)
        arr.release()


if __name__ == '__main__':
    pid = os.getpid()
    arr = Array('d', [0]*10)

    print(f'{pid}| Pass the Array')
    p = Process(target=do_job, args=(arr, ))
    p.start()
    p.join()

    print(f'{pid}| Print the Array')
    for i in arr:
        print(f'{pid}| {i}')
上述範例中使用 Array('d', [0]*10) 建立 1 個 size 為 10 的整數陣列,並將該陣列以 args 方式傳遞給新建立的 Process, 也就是 Process(target=do_job, args=(arr, )) 該 Process 會將陣列 arr 代入 do_job() 執行,該 Process 會將該陣列填入隨機整數,每次填入時都會呼叫 acquire() 以獲得鎖,填入隨機整數之後,再呼叫 release() 已釋放鎖。
前述範例的執行結果如下,可以看到 2 個不同的 PID 在傳送與接收資料:
10108| Pass the Array
10159| Got the Array
10108| Print the Array
10108| 71.0
10108| 66.0
10108| 78.0
10108| 24.0
10108| 87.0
10108| 0.0
10108| 54.0
10108| 0.0
10108| 50.0
10108| 45.0
RawArray
Note that setting and getting an element is potentially non-atomic – use Array() instead to make sure that access is automatically synchronized using a lock.
RawArray 與 Array 相似,用於 IPC 以傳遞多個相同型態(type)的資料,但是 RawArray 並不保證寫入、讀取具備原子性(atomic), 也沒有 acquire() , release() 等 Lock 相關方法可以呼叫,如果多個 Process 同時存取,很高機率會有 race condition 問題發生。
因此, RawArray 只適合用來傳遞唯讀(read only)的資料。
以下是使用 RawArray 進行 IPC 的範例:
import os
import random

from multiprocessing import Process, RawArray


def do_job(array):
    pid = os.getpid()
    print(f'{pid}| Got the RawArray')
    for i in array:
        print(f'{pid}| {i}')


if __name__ == '__main__':
    pid = os.getpid()
    arr = RawArray('d', [random.randint(0, 100) for _ in range(10)])

    print(f'{pid}| Pass the RawArray')
    p = Process(target=do_job, args=(arr, ))
    p.start()
    p.join()
上述範例中使用 RawArray('d', [random.randint(0, 100) for _ in range(10)]) 建立 1 個 size 為 10 的隨機整數陣列,並在 Process(target=do_job, args=(arr, )) 中傳遞給子 Process 。
前述範例執行結果如下,可以看到 2 個不同的 PID 在傳送與接收資料:
9317| Pass the RawArray
9368| Got the RawArray
9368| 41.0
9368| 51.0
9368| 73.0
9368| 85.0
9368| 8.0
9368| 92.0
9368| 91.0
9368| 6.0
9368| 43.0
9368| 14.0
p.s. Value 也有 1 個相似的 RawValue 可以使用, RawValue 與 RawArray 同樣不保證原子性(atomic)
定義複雜的資料型態 - Structure
目前為止,本文都是定義簡單的資料型態並進行 IPC, 不過有些時候我們需要定義更複雜的資料結構,例如定義 1 個稱為 User 的結構,裡面有 name 與 age 兩種屬性,這時需要使用 ctypes.Structure 定義資料結構,例如:
from ctypes import Structure, c_ushort, c_wchar


class User(Structure):
    _fields_ = [
        ('name', c_wchar * 5),
        ('age', c_ushort),
    ]
只要讓資料型態繼承 ctypes.Structure 並在 _fields_ 定義清楚屬性, _fields_ 是 1 個陣列,每 1 個陣列元素都必須符合 (屬性名稱, 資料型態) tuple 格式,如上述範例所示, ('name', c_wchar * 5) 代表 name 屬性為 5 個字元長度的字串, ('age', c_ushort) 則代表 age 為 unsigned short, 更多關於型態可以參考 Fundamental data types 表格。
定義好資料型態之後,就可以將資料型態作為 Value, RawValue, Array, RawArray 的第 1 個參數,例如 RawArray(User, [('Joe', 18, ), ('Nemo', 9, )]) 代表定義 1 個元素型態為 User 的陣列,其陣列值為 [('Joe', 18, ), ('Nemo', 9, )], Python 會自動按 _fields_ 的順序將 Joe 指派給 name 屬性, 18 指派給 age 屬性,以此類推。
使用 ctypes.Structure 與 RawArray 的完整範例如下:
import os

from multiprocessing import Process, RawArray
from ctypes import Structure, c_ushort, c_wchar


class User(Structure):
    _fields_ = [
        ('name', c_wchar * 5),
        ('age', c_ushort),
    ]


def do_job(arr):
    pid = os.getpid()
    print(f'{pid}| Got the array', flush=True)
    for i in arr:
        print(f'{pid}| Name: {i.name}, Age: {i.age}', flush=True)
    print(f'{pid}| Exit', flush=True)


if __name__ == '__main__':
    arr = RawArray(User, [('Joe', 18, ), ('Nemo', 9, )])
    p = Process(target=do_job, args=(arr, ))
    p.start()
    p.join()
上述範例執行結果如下,可以看到我們能夠在另一個 Process 中讀取到自定義的資料型態:
27208| Got the array
27208| Name: Joe, Age: 18
27208| Name: Nemo, Age: 9
27208| Exit
總結
學會使用各式各樣的 IPC 方法,不同的方法有不同的應用場景,例如 Queue 適合先進先出以及多個 Processes 存取的情境, Pipe 適合僅有 2 個 processes 相互溝通的情況, Array 適合傳遞多個相同型態的資料。
理解方法的差異,才能靈活應付各種不同問題。
以上! Happy Coding!
References
multiprocessing — Process-based parallelism
ctypes — A foreign function library for Python
7 Ways to Share a Numpy Array Between Processes