海邊的 Kafka 與 Python Part 2 - Producer & Consumer
Posted on Oct 13, 2018 in Python 程式設計 - 高階 by Amo Chen ‐ 5 min read
海邊的 Kafka 與 Python - Part 1 中我們已初識 Kafka 大致樣貌,並且透過其內建指令體驗 Kafka 中 producer 與 consumer 的運作情況。本篇就會透過撰寫 Python 程式,更進一步深入了解 Kafka 的細節。
本文環境
- Docker version 18.06.1-ce
- Python 3.6.5
- kafka-python 1.4.3
- macOS High Sierra 10.13.6
安裝 kafka-python 指令:
$ pip install kafka-python==1.4.3
p.s. 如尚未建立 Kafka 執行環境,請參考 海邊的 Kafka 與 Python - Part 1
再試 Producer
以下是摘自 kafka-python 使用文件 的 producer Python 範例程式:
# -*- coding: utf-8 -*-
from kafka import KafkaProducer
from kafka.errors import KafkaError

producer = KafkaProducer(bootstrap_servers=['localhost:9092'])

# asynchronous by default
future = producer.send('my-test-topic', b'raw_bytes')
print(future)

# block for 'synchronous' sends
try:
    record_metadata = future.get(timeout=10)
    print(record_metadata)
except KafkaError:
    # decide what to do if produce request failed...
    pass

# successful result returns assigned partition and offset
print(record_metadata.topic)
print(record_metadata.partition)
print(record_metadata.offset)

# produce keyed messages to enable hashed partitioning
producer.send('my-test-topic', key=b'foo', value=b'bar')
上述範例程式透過 KafkaProducer(bootstrap_servers=['localhost:9092']) 建立一個 producer ,接著使用 producer.send('my-test-topic', b'raw_bytes') 對 topic 送出 b'raw_bytes' binary 資料。
預設使用 producer.send 會使用非同步的方式先回傳 FutureRecordMetadata object 避免阻塞程式,所以此時我們還不知道送出的訊息在 topic 的情況為何,接著我們使用 future.get(timeout=10) 試圖取得該訊息的 metadata ,而 timeout=10 代表超過 10 秒就視為 timeout 。
接著可以看到 print(record_metadata) 印出 record_metadata 是個 RecordMetadata object ,裡面記錄著 topic , partition , offset , timestamp 等資訊。
上一篇文章中已經介紹 topic , partition , timestamp ,在此不多加贅述。
那麼 offset 代表什麼呢?
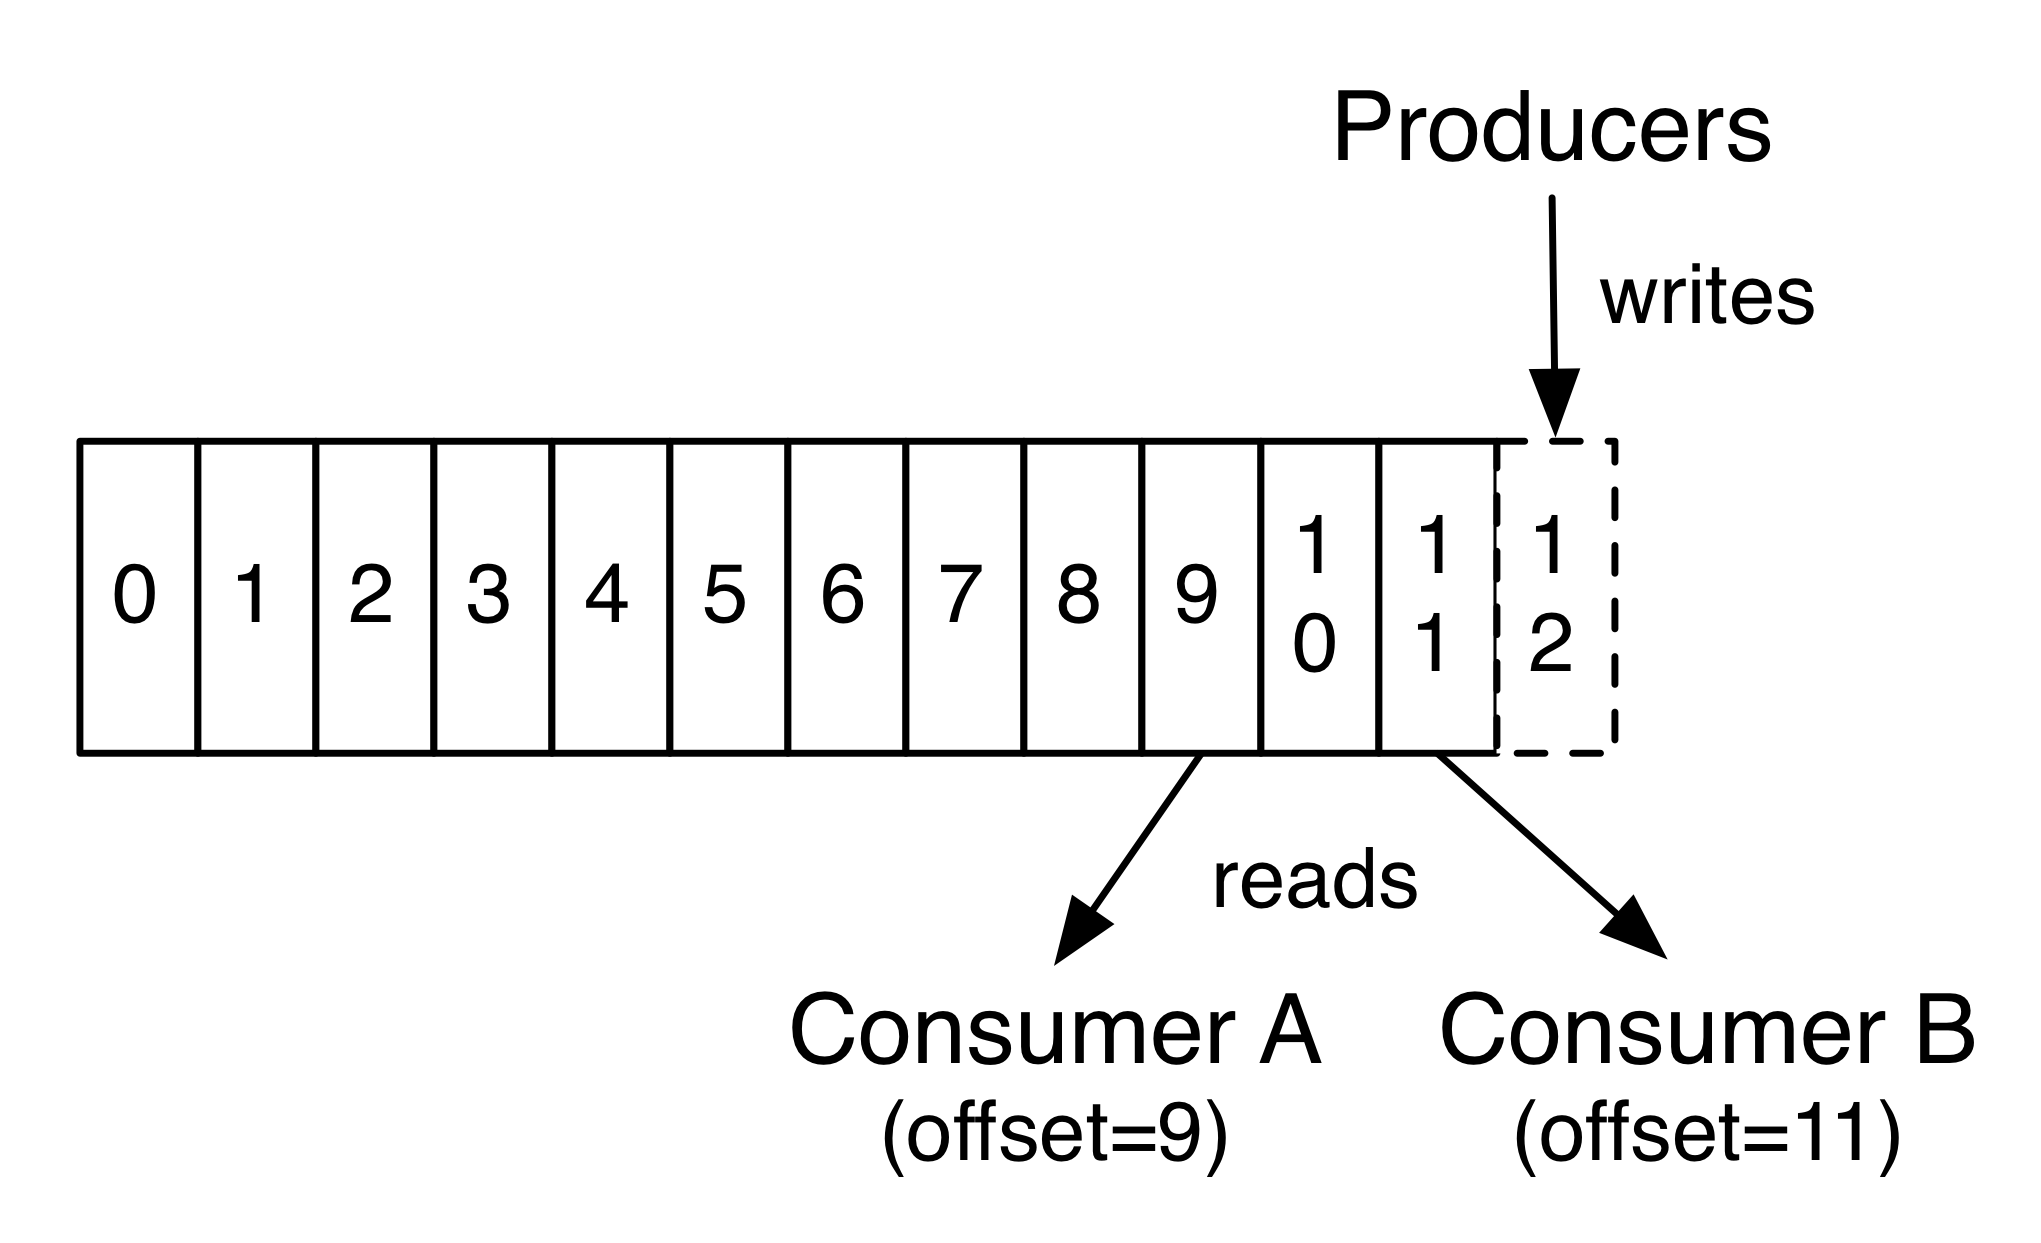
事實上,每則訊息(record)都還會紀錄其在 topic partition 中的位置,如果是最早的訊息,其 offset 就是 0 ,每新增一個訊息到 partition 其 offset 就會 +1 。
所以 Kafka 官網的圖中,如此介紹 producer, consumer 與 partition 之間如何互動:

Producer 會將訊息放到 partiton 中,每則訊息都會有 offset 代表其位置,而 consumer 讀取訊息時也同樣能夠取得 offset ,圖中畫有 2 個 consumer 分別讀取不同 offset 的訊息,也代表著每個 consumer 可以指定讀取不同 offset 的訊息。
程式的最後以 producer.send('my-test-topic', key=b'foo', value=b'bar') 再次發送訊息,這次參數多了 key=b'foo' ,也就是呼應上一篇文章所提到的每則訊息會有 key , value 與 timestamp 。 key 的作用在於 Kafka 在 topic 具有多個 partition 時,會將具有相同 key 的訊息送往相同的 partition ,如果不指定 key ,那麼 Kafka 就會以 round-robin 的方式將訊息送到不同的 partiton 之中。
上述程式執行之後,會輸出類似以下的結果:
<kafka.producer.future.FutureRecordMetadata object at 0x10ea5da58>
RecordMetadata(topic='my-test-topic', partition=0, topic_partition=TopicPartition(topic='my-test-topic', partition=0), offset=4, timestamp=1539447797151, checksum=None, serialized_key_size=-1, serialized_value_size=9)
my-test-topic
0
4
值得一提的是,訊息的 key 與 value 都需要以 binary 的形式發送。如果不是以 binary 的形式發送的話,就會出現以下的 AssertionError 。
Traceback (most recent call last):
  File "producer.py", line 25, in <module>
    producer.send('my-test-topic', key='foo', value='bar')
  File "/.../python3.6/site-packages/kafka/producer/kafka.py", line 551, in send
    assert type(key_bytes) in (bytes, bytearray, memoryview, type(None))
AssertionError
批次(batch)發佈訊息
預設的 producer 都會立即發送訊息至 Kafka 伺服器,然而當訊息量大的時候,可以考慮用批次的方式發送,降低 requests 數量,以增加效能。
Kafka producer 可使用 linger.ms 或 batch.size 這 2 項設定控制批次發送。
當設定 batch.size 為 500 時,訊息數量累積到 500 則時,就會批次發送( kafka-python 預設為 16384 則)。
當設定 linger.ms 為 5 時, producer 會等待個 5 毫秒(ms) ,如果這段等待期間有其他訊息也需要發佈,那麼就會在 5 毫秒結束後一起被發佈到 Kafka 伺服器,以減少 requests 的數量。
當同時設定 batch.size 與 linger.ms 時,只要 linger.ms 時間內先累積到 batch.size 就會先行批次發送,若時間內未滿 batch.size 就會等到 linger.ms 時間到後發送。
設定 linger.ms 與 batch.size 的範例:
# -*- coding: utf-8 -*-
from kafka import KafkaProducer


# produce json messages
producer = KafkaProducer(
    bootstrap_servers=['localhost:9092'],
    linger_ms=1000,
    batch_size=1000,
)


# produce asynchronously
for _ in range(1000):
    producer.send('my-test-topic', b'Hello Kafka')

# block until all async messages are sent
producer.flush()
上述範例同時設定 linger.ms 與 batch.size ,並且在程式最後呼叫 producer.flush() 強迫 producer 把 buffer 內的訊息發送出去。
再試 Consumer
Consumer 的部分,同樣以 kafka-python 所提供的範例進行說明:
# -*- coding: utf-8 -*-
from kafka import KafkaConsumer

consumer = KafkaConsumer(
    'my-test-topic',
    group_id='group-a',
    bootstrap_servers=['localhost:9092'],
    enable_auto_commit=False,
)

for message in consumer:
    print(message)
    print('%s:%d:%d: key=%s value=%s' % (
        message.topic,
        message.partition,
        message.offset,
        message.key,
        message.value
    ))
上述可以看到 consumer 相對簡單許多,但仍有一些細節值得詳細說明。
首先是 group_id='group-a' 的部分。事實上, consumer 還可以為自己設定群組(group),而群組會影響 Kafka 的訊息派送方式,根據 Kafka 官網的說明:
Consumers label themselves with a consumer group name, and each record published to a topic is delivered to one consumer instance within each subscribing consumer group. Consumer instances can be in separate processes or on separate machines.
If all the consumer instances have the same consumer group, then the records will effectively be load balanced over the consumer instances.
If all the consumer instances have different consumer groups, then each record will be broadcast to all the consumer processes.
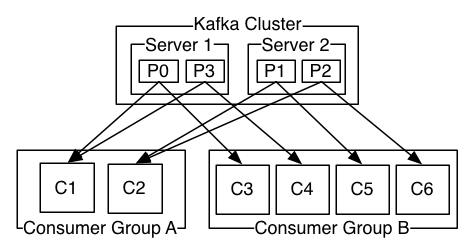
1 個群組內可以有多個 consumers 的話,那麼在派送訊息時,群組內只會有 1 個 consumer 會收到(詳細派送方式可以在官網搜尋 partition.assignment.strategy )。如果每個 consumer 都分屬不同群組(也就是每個群組都只有 1 個 consumer),那麼 Kafka 就會採取廣播的方式派送訊息,每個群組都會收到訊息。
理解上述派送方式之後,再看 Kafka 官網所提供的圖片就會比較好理解:

上述圖片敘述每個 partition 內的訊息都會派送到各個群組內的 1 個 consumer 。可以設定 2 個不同的 group_id 並執行,接著試著發佈幾則訊息,就會發現每個群組內的 1 個 consumer 都會收到訊息。如果每個群組內的 consumer 數目都一樣,那麼將會發現同一群組內的 consumer 會輪流收到訊息(也就是 round-robin)。
再來必須談到一個重要概念 — Kafka 只確保 topic 中的 partition 內的訊息順序。
Kafka topic 設計上是有次序的,寫入的順序就是 offset 的次序。當有多個 partition 時, Kafka 只能確保同一個 partition 內的訊息順序,如果你的應用(application)對順序相當要求,那麼為求安全起見,你應該只能使用 1 個 partition ,甚至 1 個 topic 只能有 1 個 consumer 。
Kafka only provides a total order over records within a partition, not between different partitions in a topic. Per-partition ordering combined with the ability to partition data by key is sufficient for most applications. However, if you require a total order over records this can be achieved with a topic that has only one partition, though this will mean only one consumer process per consumer group.
接著談談 enable_auto_commit=False ,什麼是 auto commit 呢(可以在官網搜尋 auto.commit.interval.ms 或 auto.commit.enable )?
為了防止 consumer 意外停擺,所以 consumer 預設每 5 秒,就會對 Zookeeper commit 現在 consumer 所消耗到 offset 是幾號,如果從意外恢復之後,就可以直接從最後 commit offset 之後開始重新消耗這期間停擺的工作,而不必從頭開始。
所以 enable_auto_commit=False 的設定代表停止 auto commit ,此時就得由 consumer 自行決定何時該 commit 了,也因為 enable_auto_commit=False ,所以上述範例程式,每次重新啟動都會從最早的訊息開始接收。
p.s. 預設 enable_auto_commit 為 True
不過 Kafka 並不會保存所有的訊息,每則訊息都會有過期的時候,一旦過期就會從 topic 中刪去,預設保存的時間為 168 小時,刪除後會再保留 24 小時(可以在官網搜尋 log.retention.hours delete.retention.ms ),所以當保存時間需要拉長時,就得更改設定,避免 consumer 停擺太久而漏掉訊息。
小結
本文透過實際撰寫 Kafka Python 程式進一步了解不少關於 topic , partition 與 group 等概念。下一篇將介紹更多關於 consumer 的進階使用技巧與 Log Compaction 。
- 海邊的 Kafka 與 Python Part 1 - 發佈(publish)與訂閱(subscribe)
- 海邊的 Kafka 與 Python Part 2 - Producer & Consumer
- 海邊的 Kafka 與 Python Part 3 - 海邊的 Kafka 與 Python Part 3 - Partition
References
https://kafka-python.readthedocs.io/en/master/
https://kafka.apache.org/