Python 好用模組教學 - concurrent.futures
Posted on Aug 15, 2020 in Python 程式設計 - 中階 by Amo Chen ‐ 3 min read
Python 關於平行處理的模組除了 multiprocessing 與 threading 之外,其實還提供 1 個更為簡單易用的 concurrent.futures 可以使用。
該模組提供 ThreadPoolExecutor 與 ProcessPoolExecutor 2 個經過封裝的 classes ,讓人方便上手之外,也讓程式看起來更加簡潔。
個人認為是相當值得學習&使用的模組之一,可以應付絕大多數日常關於平行處理的使用場景。
本文將透過幾個範例學習 concurrent.futures 模組。
本文環境
- Python 3.7
ThreadPoolExecutor
首先介紹 ThreadPoolExecutor 。
ThreadPoolExecutor 如其名,透過 Thread 的方式建立多個 Executors ,用以執行消化多個任務(tasks)。
例如以下範例,建立 1 個 ThreadPoolExecutor 以最多不超過 5 個 Threads 的方式平行執行 say_hello_to ,每個 say_hello_to 所需要的參數都是透過呼叫 submit 的方式交給 Executer 處理:
from concurrent.futures import ThreadPoolExecutor

def say_hello_to(name):
    print(name)

names = ['John', 'Ben', 'Bill', 'Alex', 'Jenny']

with ThreadPoolExecutor(max_workers=5) as executor:
    for n in names:
        executor.submit(say_hello_to, n)
上述範例執行結果如下:
John
Ben
Bill
Alex
Jenny
如果前述範例多執行幾次,有可能會遇到文字列印時黏在一起的情況,例如類似以下的輸出情況,這是由於多個 Thread 同時都想輸出文字而造成的情況,並非什麼神秘問題,本文將在稍後範例中解決此問題。
John
BenBill

Alex
Jenny
Future objects
接著談談 concurrent.futures 模組中相當重要的角色 —— Future 。
事實上,當呼叫 submit 後,會回傳的並不是在 Thread 執行的程式結果,而是 Future 的實例,而這個實例是一個執行結果的代理(Proxy),所以我們可以透過 done , running , cancelled 等方法詢問 Future 實例在 Thread 中執行的程式狀態如何,如果程式已經進入 done 的狀態,則可以呼叫 result 取得結果。
不過 Python 也提供更簡單的方法 —— as_completed ,幫忙檢查狀態,所以可以少寫一些程式碼。
因此前述範例可以進一步改成以下形式:
from concurrent.futures import ThreadPoolExecutor, as_completed

def say_hello_to(name):
    return f'Hi, {name}'

names = ['John', 'Ben', 'Bill', 'Alex', 'Jenny']

with ThreadPoolExecutor(max_workers=5) as executor:
    futures = []
    for n in names:
        future = executor.submit(say_hello_to, n)
        print(type(future))
        futures.append(future)

    for future in as_completed(futures):
        print(future.result())
上述範例在第 11 行取得 future 實例之後,在第 13 行將其放進 futures list 中,接著在第 15 行透過 as_completed(futures) 一個一個取得已經完成執行的 future 實例,並透過 result() 取得其結果後並列印出來。
其執行結果如下:
<class 'concurrent.futures._base.Future'>
<class 'concurrent.futures._base.Future'>
<class 'concurrent.futures._base.Future'>
<class 'concurrent.futures._base.Future'>
<class 'concurrent.futures._base.Future'>
Hi, Jenny
Hi, Bill
Hi, Ben
Hi, John
Hi, Alex
也由於我們將列印的功能從 Thread 內搬出,所以也解決列印文字可能黏在一起的情況。
除了以 submit() 先取得 Future 實例再逐一檢查狀態並取得結果之外,也可以直接利用 map() 方法直接取得 Thread 的執行結果,例如以下範例:
from concurrent.futures import ThreadPoolExecutor, as_completed


def say_hello_to(name):
    for i in range(100000):
        pass
    return f'Hi, {name}'


names = ['John', 'Ben', 'Bill', 'Alex', 'Jenny']

with ThreadPoolExecutor(max_workers=5) as executor:
    results = executor.map(say_hello_to, names)

for r in results:
    print(r)
ProcessPoolExecutor
ProcessPoolExecutor 的使用方法與 ThreadPoolExecutor 一模一樣,基本上視需求選擇使用 ThreadPoolExecutor 或 ProcessPoolExecutor 即可。
不過值得注意的是 Python 3.5 之後 map() 方法多了 1 個 chunksize 參數可以使用,而該參數只對 ProcessPoolExecutor 有效,該參數可以提升 ProcessPoolExecutor 在處理大量 iterables 的執行效能。
When using ProcessPoolExecutor , this method chops iterables into a number of chunks which it submits to the pool as separate tasks. The (approximate) size of these chunks can be specified by setting chunksize to a positive integer. For very long iterables, using a large value for chunksize can significantly improve performance compared to the default size of 1. With ThreadPoolExecutor , chunksize has no effect.
我們可以將先前範例中的 names 乘以 1000 倍的長度後,再測試設定不同 chucksize 的效能:
from concurrent.futures import ProcessPoolExecutor, as_completed


def say_hello_to(name):
    return f'Hi, {name}'


names = ['John', 'Ben', 'Bill', 'Alex', 'Jenny'] * 1000


with ProcessPoolExecutor(max_workers=4) as executor:
    results = executor.map(say_hello_to, names)
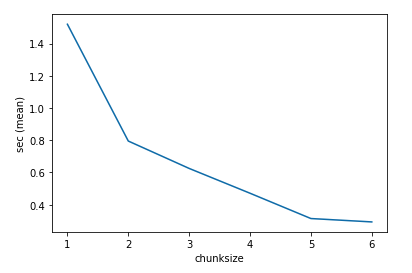
以下用 Jupyter 中的 %timeit 測試其效能:
%timeit with ProcessPoolExecutor(max_workers=4) as executor: executor.map(say_hello_to, names, chunksize=6)

上圖可以看到隨著 chunksize 的增加,程式平均的執行時間越來越短,但也不是無限制的增加,到某個數量之後,加速的幅度就開始趨緩,因此 chunksize 的設定還是得花點心思才行。
以上,就是 concurrent.futures 模組的介紹。
Happy Coding!
References
https://docs.python.org/3/library/concurrent.futures.html