隨著 Gmail 與 G Suite 的普及,越來越多人擁有 Google 的帳號,因此現代應用程式在整合登入服務時,支援使用 Google 帳號的進行登入也很重要,本篇記錄如何用 Flask 整合 Google Sign-In 。
本文環境
- Python 3.6.5
- Flask 1.0.2
- Google API Python Client 1.7.8
- Google Auth Oauthlib 0.2.0
$ pip install flask==1.0.2 google-api-python-client==1.7.8 google-auth-oauthlib==0.2.0
跟隨指引
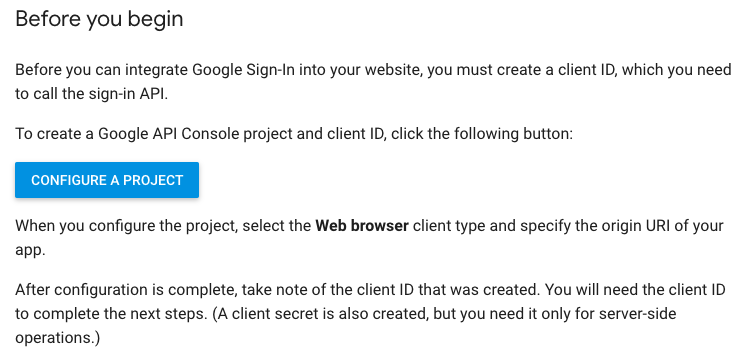
前端整合 Google Sign-In 的步驟可以參考 Integrating Google Sign-In into your web app 一文。
主要是透過該文章提供的 CONFIGURE A PROJECT 按鈕新增一組 OAuth 2.0 Client ID (OAuth 2.0 用戶端 ID) 。
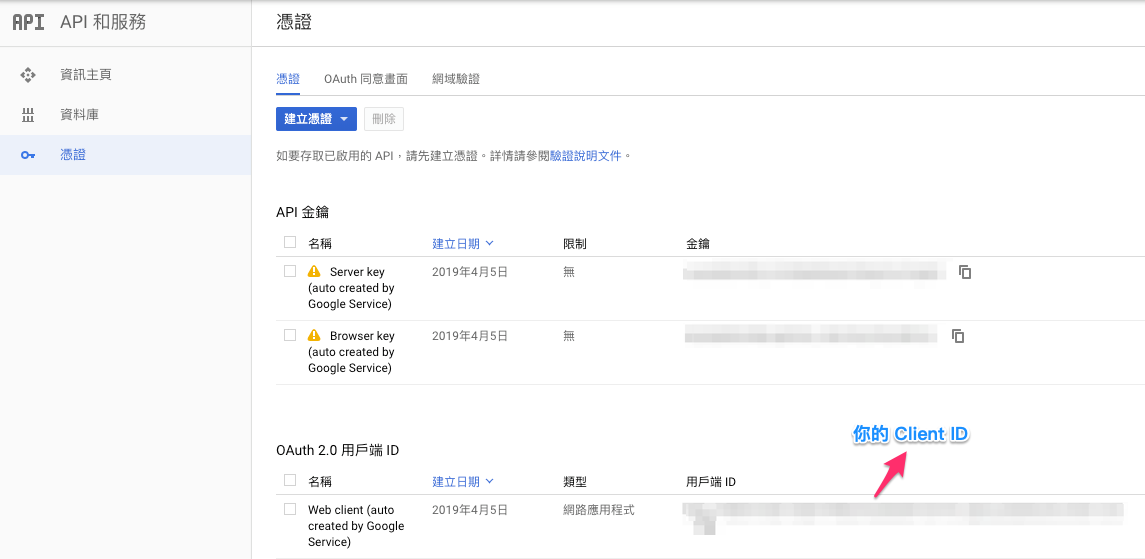
該組 ID 同樣可以在 Google Developers Console 中查到:
接著,為了整合方便,我們需要編輯該上述 OAuth 2.0 Client 的設定,加入 http://localhost:5000 (Flask 預設的通訊埠為 5000),使得我們可以在本機(localhost)執行 Google 所提供的 Javascript SDK 。
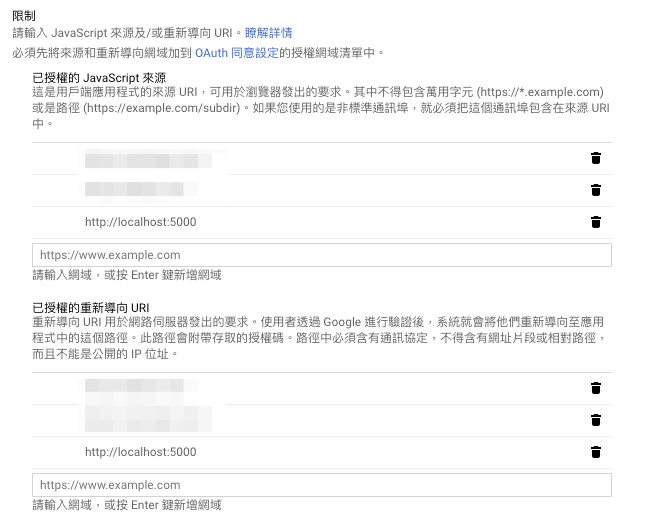
p.s. 請視情況加入你的域名清單至設定中
架設 Flask Server
取得 OAuth 2.0 Client ID 之後,就可以接著架設 Flask Server 進行後續的整合,以下是本文的 Flask 專案結構:
  .
  └── app/
       ├── app.py
       └── templates/
            └── index.html
app/ 資料夾內 app.py 是簡單的 Flask 程式,主要用來執行 Web server 並載入 templates/ 資料夾內的 index.html 以顯示 Google 登入頁給使用者。
app.py 內容如下(請將 your_oauth2_client_id 更換成你的 OAuth 2.0 Client ID ):
# -*- coding: utf-8 -*-
from google.oauth2 import id_token
from google.auth.transport import requests

from flask import Flask
from flask import request
from flask import jsonify
from flask import render_template


GOOGLE_OAUTH2_CLIENT_ID = 'your_oauth2_client_id'


def create_app(app_env=None):
    flask_app = Flask(__name__)
    return flask_app


app = create_app()


@app.route('/')
def index():
    return render_template('index.html', google_oauth2_client_id=GOOGLE_OAUTH2_CLIENT_ID)


@app.route('/google_sign_in', methods=['POST'])
def google_sign_in():
    token = request.json['id_token']

    try:
        # Specify the GOOGLE_OAUTH2_CLIENT_ID of the app that accesses the backend:
        id_info = id_token.verify_oauth2_token(
            token,
            requests.Request(),
            GOOGLE_OAUTH2_CLIENT_ID
        )

        if id_info['iss'] not in ['accounts.google.com', 'https://accounts.google.com']:
            raise ValueError('Wrong issuer.')

        # ID token is valid. Get the user's Google Account ID from the decoded token.
        # user_id = id_info['sub']
        # reference: https://developers.google.com/identity/sign-in/web/backend-auth
    except ValueError:
        # Invalid token
        raise ValueError('Invalid token')

    print('登入成功')
    return jsonify({}), 200
上述程式中值得說明的是 google_sign_in 會接收來自 index.html 所發出的 POST request ,並取得 request 中的 id_token 資料。接著利用 Google 所提供的官方 OAuth2 套件驗證該 id_token 是否為 Google 所發出的 token ,如果是正確的 token 就能夠取得使用者的 Google 資料( email, ID, Name 等使用者所授權的資料)。至此我們可以將這些資料依照需求自行儲存至資料庫中,並視為使用者完成註冊或登入(本文就不多加示範這段過程囉!)。
p.s. 上述程式中的 id_info 存有哪些資料可以參閱 https://developers.google.com/identity/sign-in/web/backend-auth
index.html 內容如下:
<html>
  <head>
    <title>Google Sign-In</title>
    <meta name="google-signin-client_id" content="{{ google_oauth2_client_id }}">
    <script src="https://apis.google.com/js/platform.js" async defer></script>
    <script src="https://code.jquery.com/jquery-3.3.1.js" integrity="sha256-2Kok7MbOyxpgUVvAk/HJ2jigOSYS2auK4Pfzbm7uH60=" crossorigin="anonymous"></script>
  </head>
  <body>
    <script>
      function onSignIn(googleUser) {
        var id_token = googleUser.getAuthResponse().id_token;
        var profile = googleUser.getBasicProfile();
        console.log('ID: ' + profile.getId()); // Do not send to your backend! Use an ID token instead.
        console.log('Name: ' + profile.getName());
        console.log('Image URL: ' + profile.getImageUrl());
        console.log('Email: ' + profile.getEmail()); // This is null if the 'email' scope is not present.
        $.ajax({
          type: "POST",
          url: '/google_sign_in',
          data: JSON.stringify({'id_token': id_token}),
          success: function() {
            console.log('login success')
          },
          dataType: 'application/json',
          contentType:"application/json",
        });
      }
    </script>
    <div class="g-signin2" data-onsuccess="onSignIn"></div>
  </body>
</html>
上述範例程式則相對簡單,載入 https://apis.google.com/js/platform.js Google 所提供的 SDK 之後,並加入 <div class="g-signin2" data-onsuccess="onSignIn"></div> 讓 Google 的 SDK 自行在該 HTML 元素加入 Google 登入按鈕。接著實作 onSignIn 函式,該函式會在使用者授權登入後執行,因此可以透過 googleUser.getAuthResponse().id_token 取得使用者的 id_token ,並送至後端伺服器的 API 完成後續的登入流程。
值得注意的是 Google 推薦前端只傳送 id_token 至後端伺服器的 API 即可,這是因為透過後端驗證 id_token 的正確性之後,再利用該 id_token 取得使用者的相關資料是最安全的,如此可避免有人偽造資料。
最後,執行以下指令試試看是否能夠透過 Google Sign-In 吧!
$ env FLASK_APP=app.py flask run
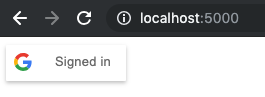
接著打開 http://localhost:5000 正確執行的話就可以看到首頁出現 Google 登入按鈕。
按下登入按鈕後 Flask Server 則列印登入成功文字!

以上就是 Flask 如何整合 Google Sign-In 的紀錄! Happy Coding!
Reference
https://developers.google.com/identity/sign-in/web/sign-in