Golang VSCode 開發環境建置 - 手把手教學
Last updated on Mar 2, 2023 in Go 程式設計 - 初階 by Amo Chen ‐ 4 min read
VS Code 作為 Go 的 IDE 其實相當方便,但由於初學者多半對 GOPATH 或 launch.json 的設定仍處於半生不熟的情況,對於環境設定都會感到棘手,因此本文特別將過程陳列出來,以期大家都能夠開啟一段愉快的 Go 旅程。
本文環境
- macOS
Requirements
VSCode Extension - Go
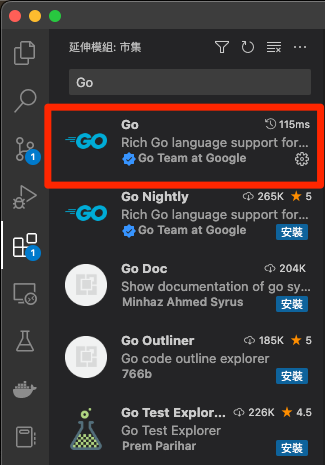
安裝完 VSCode 與 Golang 之後,打開 VSCode 的擴充功能,安裝 Go (微軟官方維護) 擴充功能。

GOPATH 設定
GOPATH 是 Golang 很重要的一項環境變數,相當於 Go 的工作區(workspace),相關的套件、工具都會安裝到 GOPATH 底下。
如果要查看現在的 GOPATH 設定,可以按下 Command + Shift + p 呼叫命令列視窗,輸入 Go: Current GOPATH 查看。

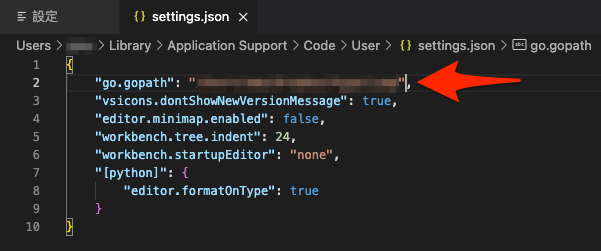
如果要設定 GOPATH 則可以按下 Command + , 開啟使用者設定,輸入 "go.gopath": "<your gopath>" 進行設定。


安裝 Golang 相關工具
Go 擴充功能整合了多種 Go 工具,例如 gocode, gorename, godoc, golint 等,詳見 Go tools that the Go extension depends on ,這些工具預設會裝在 GOPATH 底下,裝完之後就擁有最基本的 Go 開發環境。
安裝 Go 工具的方法為按下 Command + Shift + p 呼叫命令列視窗,輸入 Go: Install/Update tools 安裝/更新所有的工具:

裝完擴充功能之後,在 VSCode 編輯個 .go 作為副檔名的檔案,可能會看到右下角出現 Analysis Tools Missing ,這時代表未安裝 Go 的相關工具,可以透過前述方法安裝 Go 的相關工具。
p.s. 如果未設定好 GOPATH 可能會出現 vscode go get golang.org/x/tools/gopls: mkdir /usr/local/go/bin/pkg: permission denied 等權限問題
Debugging with VSCode
裝完 Go 擴充功能與 Go 的相關工具之後,可以寫一段程式後按下 F5 執行試試。
例如 helloworld.go:
package main

import "fmt"

func main() {
	fmt.Println("Hello World!")
}

到這步驟應該會發現連最簡單的 Go Hello World 都不能執行,錯誤訊息如下所示,此處通常也是最令人感到沮喪的一步,這是因為 VS Code 還不知道要怎麼啟動(launch)我們的程式。

Build Error: go build -o /.../gotour/__debug_bin -gcflags all=-N -l .
go: cannot find main module; see 'go help modules' (exit status 1)
launch.json
為了修好 VS Code 不知道怎麼啟動 Go 程式的問題,我們需要建立並設定 launch.json 檔案,可以在 VS Code 左邊工具欄的 Run and Debug 找到這個選項:

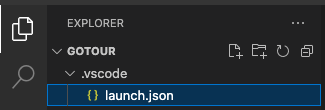
或者在專案資料夾建立一個 .vscode/launch.json 檔也可以 :

預設的 launch.json 如下,可以整段複製貼上後儲存:
{
    // Use IntelliSense to learn about possible attributes.
    // Hover to view descriptions of existing attributes.
    // For more information, visit: https://go.microsoft.com/fwlink/?linkid=830387
    "version": "0.2.0",
    "configurations": [
        {
            "name": "Launch Package",
            "type": "go",
            "request": "launch",
            "mode": "auto",
            "program": "${file}"
        }
    ]
}
接著再試著執行看看剛剛的 helloworld.go ,應該就能正常執行:

Go version 1.16.0 is too old
如果你所使用的 Go 版本太舊,就會出現類似以下的錯誤:
Failed to launch: Go version 1.16.0 is too for this version of Delve (minimum supported version 1.18, suppress this error with --check-go-version=false)
這時可以更改 launch.json 加入 "dlvFlags": ["--check-go-version=false"] 停用版本檢查,就能夠解決問題:
{
    // Use IntelliSense to learn about possible attributes.
    // Hover to view descriptions of existing attributes.
    // For more information, visit: https://go.microsoft.com/fwlink/?linkid=830387
    "version": "0.2.0",
    "configurations": [
        {
            "name": "Launch file",
            "type": "go",
            "request": "launch",
            "mode": "debug",
            "program": "${file}",
            "dlvFlags": ["--check-go-version=false"]
        }
    ]
}
launch.json 設定重點解說
launch.json 其實就是告訴 VS Code 如何執行 go build 等指令,以執行 helloworld.go 為例,其實 VS Code 最後會按照設定,執行類似以下的指令:
go build -o /.../gotour/__debug_bin -gcflags all=-N -l ./helloworld.go
launch.json 其中比較需要了解的設定為 program ,該設定支援 ${file} , ${fileDirname} , ${workspaceFolder} 等選項(預設為 ${workspaceFolder} )。
${file}
${file} 代表你想編譯執行的檔案,如果以上述指令為例,執行的指令類似以下形式:
go build -o /.../gotour/__debug_bin -gcflags all=-N -l ${file}
以 helloworld.go 為例,當我們在這個檔案按下 F5 時, ${file} 就會被置換成 helloworld.go , 變成:
go build -o /.../gotour/__debug_bin -gcflags all=-N -l ./helloworld.go
${fileDirname}
${fileDirname} 代表你想編譯執行檔案的所在資料夾,當你有多個檔案在同一個資料夾需要一起編譯時,就得將 program 設定為 ${fileDirname} 。
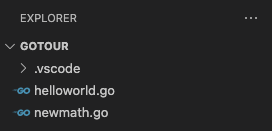
例如,我們有 2 個檔案,分別為 helloworld.go 與 newmath.go , 其中 helloworld.go 用到 newmath.go 的 Add 函式,所以編譯時必須 2 個檔案要一起編譯 :

helloworld.go
package main

import (
	"fmt"
)

func main() {
	fmt.Println("Hello World!")
	fmt.Println(Add(1, 2))
}
newmath.go
package main

func Add(x, y int) int {
	return x + y
}
如果保持 "program": "${file}" 設定,就會造成以下的錯誤,可以看到 VS Code 僅編譯 helloworld.go , 少了 newmath.go 導致 undefined: Add 錯誤發生:
Build Error: go build -o /.../gotour/__debug_bin -gcflags all=-N -l ./helloworld.go
# command-line-arguments
./helloworld.go:9:14: undefined: Add (exit status 2)
這時要將 launch.json 設定改為 "program": "${fileDirname}" 才行。
最後一塊拼圖 - go modules
最後,再試圖執行一遍 helloworld.go 仍會發生類似的錯誤, go 找不到 main 模組,造成編譯失敗:
Build Error: go build -o /.../gotour/__debug_bin -gcflags all=-N -l .
go: cannot find main module; see 'go help modules' (exit status 1)
這邊的鍋就不是 VS Code 造成的,這是因爲 go modules 導致的錯誤。
由於 Go 1.13 之後預設開啟 go modules, 因此 go 會試圖從 go.mod 尋找模組的路徑,由於我們少了 go.mod 造成編譯錯誤,如果要修正這個錯誤,有 2 種方法,擇一即可:
- 關掉 go modules
- 建立
go.mod檔案
關掉 Go modules
關掉 go modules 相當簡單,只要在 launch.json 設定的 env 區塊中加入 "GO111MODULE": "off" 設定即可:
{
    "version": "0.2.0",
    "configurations": [
        {
            "name": "Launch Package",
            "type": "go",
            "request": "launch",
            "mode": "auto",
            "program": "${fileDirname}",
            "dlvFlags": ["--check-go-version=false"],
            "env": {
                "GO111MODULE": "off"
            }
        }
    ]
}
建立 go.mod 檔案
建立 go.mod 檔案可以按下快捷鍵 Command + Shift + p , 輸入 Go: Initialize go.mod 後,輸入模組名稱即可(以本文為例為 main )。


上述 2 種方式都可以解決 go: cannot find main module 錯誤,但由於 Go 1.13 之後已經推崇使用 go modules 進行開發,我會建議使用第 2 種方式建立 go.mod 較好。
如果正確執行的話,就能夠在 VS code 的 OUTPUT 看到以下結果:
Hello World!
3
總結
VS Code 提供的設定不只本文所提及的部分,本文僅就初學者必要的部分進行教學,其他更詳細的設定可以參閱 Debugging Go code using VS Code ,該文件也說明如何進行遠端偵錯(Remote Debugging),建議閒暇之餘可以看一下。
以上。 Happy Coding!
References
https://github.com/Microsoft/vscode-go/wiki/Go-tools-that-the-Go-extension-depends-on
https://github.com/Microsoft/vscode-go/wiki/GOPATH-in-the-VS-Code-Go-extension
https://github.com/Microsoft/vscode-go/wiki/Debugging-Go-code-using-VS-Code