常言道「不會 rebase, 等於沒學過 Git」,由此可見 rebase在 Git 內有多重要。
在開始本文之前,請大家牢記千萬不要對已經 push 到遠端儲存庫(remote repository) 而且已經有人正在使用的提交進行 rebase ,這是很危險的!詳情請見 The Perils of Rebasing 。
Do not rebase commits that exist outside your repository and that people may have based work on.
改變歷史是很危險的!請牢記在心!
接下來,本文會說明什麼是 rebase,並且介紹 rebase 的基本用法。
什麼是 rebase
Rebase 對很多人來說是很抽象的概念,因此它的學習門檻在於如何了解這個抽象的概念。
對於 rebase 比較恰當的比喻應該是「移花接木」,簡單來講把你的分支接到別的分支上,稍後我們會用圖說明 merge 與 rebase 的差異。
了解 rebase 之前,我們必須了解什麼是 base 。
對 Git 的使用者而言,在分支進行開發是稀鬆平常的事情,因此在合併管理分支時,也就需要了解分支是在哪個提交分出來的旁支,而長出旁支來的提交點,對於旁支來說就是 base commit, 也就是 base 。
所以簡單來說, rebase 其實就是改變分支的 base 的功能。
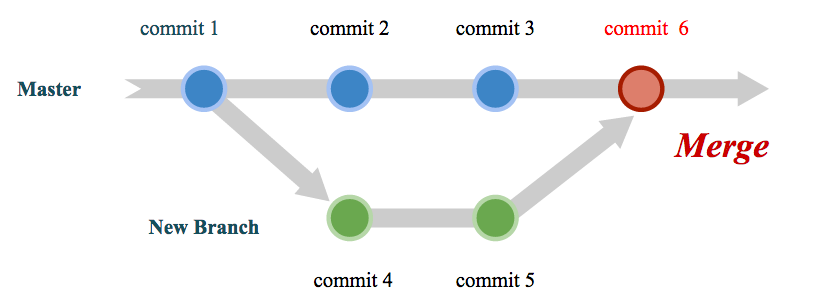
下圖是在 merge 所產生的版本演進的示意圖,可以看到在新的分支 New branch 中所做的變更,在合併之後,一併成為一個新的提交(commit 6)。而 commit 1 就是 New Branch 的 base , 因為是從這個 commit 開始分出新的分支。
下圖則是 rebase 所產生的版本演進的示意圖。我們同樣是在分支中進行開發的動作,但是在 rebase 時,與 merge 不同的是,Git 會將分支上所做的變更先暫存起來,接著把 new base (或稱新基準點)合併進來,最後直接將剛剛暫存起來的變更在分支上重演,這邊用「重演」這個字眼是表示 rebase 不是將提交(commit)複製到分支上,而是將整個變更過程一個一個重新套用到分支上 ,也就因為如此 commit 2' 與 commit 3',才會特別以另外的 ' 符號表示,帶表與原本的 commit 2, commit 3 不同,這點可以從 commit 的 commit id 不同看出來,雖然變更的內容相同,但是 commit
Id 不同。本文會在稍後實際演練一遍。
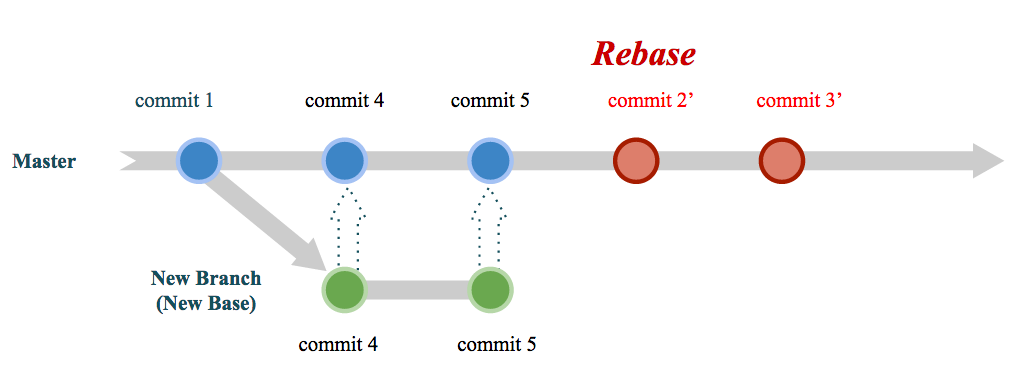
因為如此,所以 rebase 的行為很像「移花接木」,以上圖來說,就是把 New Branch 的變更整個接到 Master 分支上。
接下來的文章中,將會傳授 rebase 的 2 大主軸:
- 基礎用法
- 進階互動模式
在基礎用法中,我們將學習 rebase 分支剪接的部分。
而進階互動模式中將會說明如何交換提交次序、修改提交內容、合併提交內容,甚至將一個提交拆解成多個提交。
Rebase 基本用法
以下我們用一個情境示範 rebase 的基礎用法:
你是一位 team lead,你的其中一項職務就是負責進行程式碼審查(code review),並且將不同程式分支進行合併管理。 現在有 2 位程式設計師以 main 分支為基礎,分別開了新的分支 feature/login 與 feature/signup, 也都已經完工了。 你希望利用 rebase 的方式將這 2 個分支併入 main 分支中。
首先, main 的日誌如下所示:
$ git log --oneline
36abac1 (HEAD -> main) 2nd commit
3695af2 1st commit
接著,feature/login 的日誌如下所示:
$ git log --oneline
54a5341 (HEAD -> feature/login) feature/login 1st commit
36abac1 (main) 2nd commit
3695af2 1st commit
最後是 feature/signup 的日誌:
$ git log --oneline
e94ab5e (HEAD -> feature/signup) feature/signup 2nd commit
a71bc5b feature/signup 1st commit
36abac1 (main) 2nd commit
3695af2 1st commit
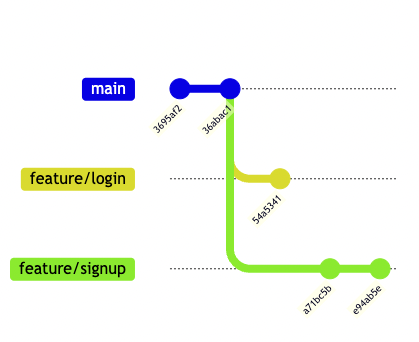
可以看到 feature/login 與 feature/signup 分別比 main多出了 1 至 2 個提交。
假設這 2 個分支運作的很好下,我們開始進行 rebase 。
切換到 main 分支:
$ git checkout main
rebase feature/login 分支:
$ git rebase feature/login
Successfully rebased and updated refs/heads/main.
在上述指令中,我們先切換到 main 分支中,接著我們利用指令 git rebase feature/login 進行 rebase 。
此時, main 分支的 commit log 已經變成:
$ git log --oneline
54a5341 (HEAD -> main, feature/login) feature/login 1st commit
36abac1 2nd commit
3695af2 1st commit
在上述指令執行結果中,可以看到 feature/login 的 commit id 並沒有產生變化,與本文先前提到的「重演」顯然有所出入。
這是由於, git 在進行 rebase 時採用 fast-forwarded 的做法進行合併的緣故,那麼 fast-forwarded 是什麼意思呢?
Fast-forwarded 指的就是當 2 個分支的頭尾相接時,代表 2 者之間不會有 conflict ,因此只要改 HEAD 的指向就能夠迅速合併了。
以本情境為例, main 的最後一個提交正好是 feature/login 的頭,所以這 2 者的 rebase 適用 fast-forwarded 模式,所以 main 的 HEAD 改為 54a5341 就完成合併了。
最後, rebase feature/signup:
$ git rebase feature/signup
Successfully rebased and updated refs/heads/main.
接下來,可以用 git log 看看 main 分支的日誌,我們可以從日誌中發現feature/login 與 feature/signup 的 commit id 都不一樣了:
$ git log --oneline
188e157 (HEAD -> main) feature/login 1st commit
e94ab5e (feature/signup) feature/signup 2nd commit
a71bc5b feature/signup 1st commit
36abac1 2nd commit
3695af2 1st commit
以上就是簡單的 rebase 過程。
但是在這過程中,有些人可能產生了幾個疑問:
「為什麼先 rebase feature/login 再 rebase feature/signup 後,會是feature/login 的日誌在最上方呢?」
這是由於 rebase 會先找出與新分支之間最近的一個共同 base,然後先保留 HEAD 所在分支(也就是當前分支,以上述範例為例就是 main 分支)從共同 base 開始的所有變更,接著從共同 base 開始,將新分支的變更重新套用到 HEAD 的所在分支後,再將方才所保留的當前分支變更一個一個套用進來,也因此 feature/login 會是最後的一個 commit 。
我們一樣以圖示進行說明。
下圖 是 rebase feature/login 之後的樣子,可以看到 rebase feature/login 之後的 main 與 feature/signup 的共同 base 是 commit 36abac1:
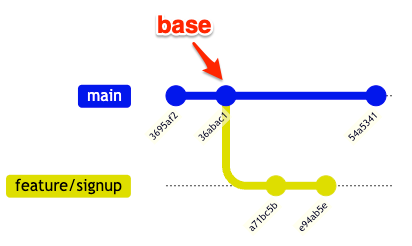
因此要 rebase feature/signup 的話, commit 54a5341 會先被暫存起來,先進行 rebase feature/signup 之後,再將剛剛暫存的 commit 54a5341 重演一次,所以下圖 rebase feature/signup 之後, feature/login 的 commit id 就從 54a5341 變成 188e157 ,這就是 rebase 的過程。
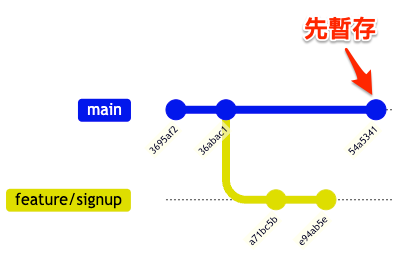
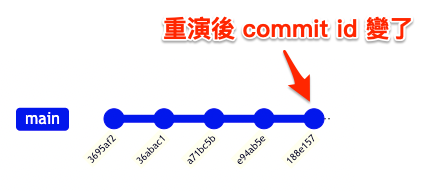
p.s. rebase feature/signup 也適用 fast-forwarded 的合併,所以最後只有 feature/login 的 commit 因爲重演而改變。
Rebase onto
問題又來了,剛剛學的 rebase 會將整個分支都接上去,有時候我們不需要整個分支都接上去,只要接到分支上的某個提交的點即可,這種情況下可以使用 rebase —onto 進行。
假設要將 feature/signup 的 commit a71bc5b 合併到 main 就好,就可以用以下指令進行 rebase:
$ git checkout main
$ git rebase feature/signup --onto a71bc5b
git rebase feature/signup --onto a71bc5b 執行前:
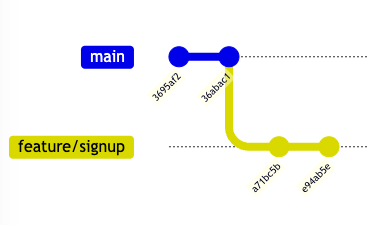
經過 rebase 之後,可以發現只有 a71bc5b 被合併到 main 分支:
$ git log --oneline
a71bc5b (HEAD -> main) feature/signup 1st commit
36abac1 2nd commit
3695af2 1st commit
這時候 feature/signup 與 main 的 base 就變成 a71bc5b:
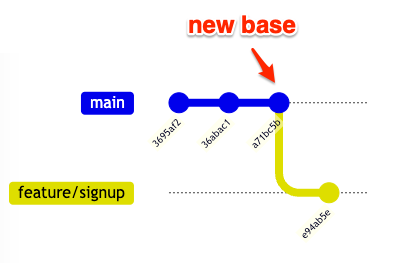
又或者,想要把我們現在分支的 base 改成另一個點,可以使用以下指令:
$ git rebase --onto <new base-commit> <current base-commit>
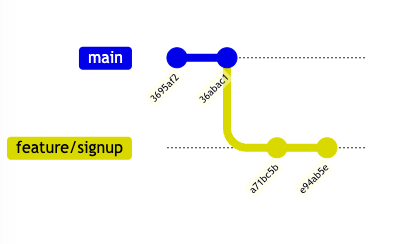
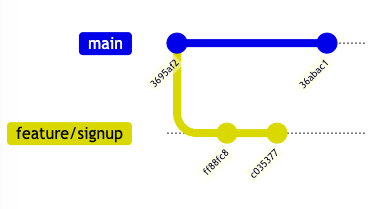
例如,我們在 feature/signup 分支上時,想把整個分支接到 commit 3695af2 時,可以輸入以下指令:
$ git co feature/signup # 先切換到 feature/signup
$ git rebase --onto 3695af2 36abac1
上述指令執行成功之後,可以發現 feature/signup 的 base 變了之外,也可以發現 commit id 變了,這是因為 rebase 改變 base 會重演分支上的 commit 造成的變化:
$ git log --oneline
c035377 (HEAD -> feature/signup) feature/signup 2nd commit
ff88fc8 feature/signup 1st commit
3695af2 1st commit
下面 2 張圖就是執行上述指令的前後對照。
Rebase 之前:
Rebase 之後:
Rebase - 進階互動(interactive)模式
Rebase 的互動模式十分強大,可以允許我們交換提交的次序、修改提交內容、合併提交內容,甚至將一個提交拆解成多個提交。
要進入互動模式的基本指令如下, commit 可以是分支上的任意一點:
$ git rebase -i <commit id>
例如,我們想整理 feature/signup 上的所有 commit 時:
$ git checkout feature/signup # 切換到 feature/signup 分支
$ git rebase -i 36abac1
上述指令的意思就是我們希望將 feature/signup 從 commit 36abac1 之後的所有提交進行整理(注意,不含 commit 36abac1)。
執行成功後,會出現類似以下的訊息,從結果可以注意到所有 commit id 與 commit message 從上到下,是從最早到最新的方式進行排列:
pick a71bc5b feature/signup 1st commit
pick e94ab5e feature/signup 2nd commit

# Rebase 36abac1..e94ab5e onto 36abac1 (2 commands)
#
# Commands:
# p, pick <commit> = use commit
# r, reword <commit> = use commit, but edit the commit message
# e, edit <commit> = use commit, but stop for amending
# s, squash <commit> = use commit, but meld into previous commit
# f, fixup [-C | -c] <commit> = like "squash" but keep only the previous
#                    commit's log message, unless -C is used, in which case
#                    keep only this commit's message; -c is same as -C but
#                    opens the editor
# x, exec <command> = run command (the rest of the line) using shell
# b, break = stop here (continue rebase later with 'git rebase --continue')
# d, drop <commit> = remove commit
# l, label <label> = label current HEAD with a name
# t, reset <label> = reset HEAD to a label
# m, merge [-C <commit> | -c <commit>] <label> [# <oneline>]
# .       create a merge commit using the original merge commit's
# .       message (or the oneline, if no original merge commit was
# .       specified); use -c <commit> to reword the commit message
#
# These lines can be re-ordered; they are executed from top to bottom.
#
# If you remove a line here THAT COMMIT WILL BE LOST.
#
# However, if you remove everything, the rebase will be aborted.
在進一步操作前,我們必須對上述訊息提到的幾個指令(commands)進行說明:
pick: 保留此提交reword: 修改提交的訊息(只改提交訊息)edit: 保留此提交,但是需要做一些修改(例如在程式裡面多加些註解)squash: 保留此提交,但是將上面的提交(也就是上一個 commit)併入此提交,此動作會顯示提交訊息供人編輯fixup: 與squash相似,但是此 commit 的訊息會被丟掉exec: 執行 shell 指令,例如 exec make test 進行一些測試,可以隨意穿插在提交點之間
接下來示範幾種操作。
變換 commit 順序
如果想變換提交的順序,我們只要進入 rebase 互動模式後,將 commit 的順序進行變動,就能夠變換順序了!
# 調換順序 ↓
pick e94ab5e feature/signup 2nd commit
pick a71bc5b feature/signup 1st commit

# Rebase 36abac1..e94ab5e onto 36abac1 (2 commands)
#
# Commands:
# p, pick <commit> = use commit
# r, reword <commit> = use commit, but edit the commit message
# e, edit <commit> = use commit, but stop for amending
# s, squash <commit> = use commit, but meld into previous commit
# f, fixup [-C | -c] <commit> = like "squash" but keep only the previous
#                    commit's log message, unless -C is used, in which case
#                    keep only this commit's message; -c is same as -C but
#                    opens the editor
# x, exec <command> = run command (the rest of the line) using shell
# b, break = stop here (continue rebase later with 'git rebase --continue')
# d, drop <commit> = remove commit
# l, label <label> = label current HEAD with a name
# t, reset <label> = reset HEAD to a label
# m, merge [-C <commit> | -c <commit>] <label> [# <oneline>]
# .       create a merge commit using the original merge commit's
# .       message (or the oneline, if no original merge commit was
# .       specified); use -c <commit> to reword the commit message
#
# These lines can be re-ordered; they are executed from top to bottom.
#
# If you remove a line here THAT COMMIT WILL BE LOST.
#
# However, if you remove everything, the rebase will be aborted.
修改提交內容
有些時候,我們提交之後,不免會註解忘了加或是程式內還有測試的 code 忘記清掉。這時候除了用 git reset --soft HEAD^ 之外,也可以用
rebase 編輯那些需要修正的提交。
例如,我們希望用 rebase 在 commit a71bc5b 中添加幾個提交,就可以將 pick 改成 edit 進入編輯狀態。
# ↓ 改為 edit
edit a71bc5b feature/signup 1st commit
pick e94ab5e feature/signup 2nd commit

# Rebase 36abac1..e94ab5e onto 36abac1 (2 commands)
#
# Commands:
# p, pick <commit> = use commit
# r, reword <commit> = use commit, but edit the commit message
# e, edit <commit> = use commit, but stop for amending
# s, squash <commit> = use commit, but meld into previous commit
# f, fixup [-C | -c] <commit> = like "squash" but keep only the previous
#                    commit's log message, unless -C is used, in which case
#                    keep only this commit's message; -c is same as -C but
#                    opens the editor
# x, exec <command> = run command (the rest of the line) using shell
# b, break = stop here (continue rebase later with 'git rebase --continue')
# d, drop <commit> = remove commit
# l, label <label> = label current HEAD with a name
# t, reset <label> = reset HEAD to a label
# m, merge [-C <commit> | -c <commit>] <label> [# <oneline>]
# .       create a merge commit using the original merge commit's
# .       message (or the oneline, if no original merge commit was
# .       specified); use -c <commit> to reword the commit message
#
# These lines can be re-ordered; they are executed from top to bottom.
#
# If you remove a line here THAT COMMIT WILL BE LOST.
#
# However, if you remove everything, the rebase will be aborted.
儲存上述檔案之後,如果用 git status 就可以看到我們正在 rebase的訊息:
$ git status
interactive rebase in progress; onto 36abac1
Last command done (1 command done):
   edit a71bc5b feature/signup 1st commit
Next command to do (1 remaining command):
   pick e94ab5e feature/signup 2nd commit
  (use "git rebase --edit-todo" to view and edit)
You are currently editing a commit while rebasing branch 'feature/signup' on '36abac1'.
  (use "git commit --amend" to amend the current commit)
  (use "git rebase --continue" once you are satisfied with your changes)

nothing to commit, working tree clean
在這個狀態下,如果你只是想修正提交訊息,可以用以下指令 :
$ git commit --amend
在這個狀態下,如果你需要多增加幾個提交,直接編輯吧** ,接著用 git add <file> , git commit -m <message> 等一般操作進行。
最後利用以下指令完成 rebase:
$ git rebase --continue
又或者,我們現在編輯的提交實在是太大了,可能對程式碼審查的人造成困擾,例如同時修正太多個檔案,我們希望拆成比較明確的多個提交 ,就可以用以下指令回到未提交前的狀態:
$ git reset --soft HEAD^
然後可以用 git status 列出這個提交中變更了多少檔案,然後依照需求一個一個用 git add 加進去後提交,多提交個幾次,就等於是將一個提交拆成多個提交囉!
不過別忘了,要用以下指令結束 rebase:
$ git rebase --continue
合併 commits
如果想合併多個 commit 則可以使用 squash, squash 時會讓我們編輯 commit 訊息:
pick a71bc5b feature/signup 1st commit
# ↓ 改為 squash
squash e94ab5e feature/signup 2nd commit

# Rebase 36abac1..e94ab5e onto 36abac1 (2 commands)
#
# Commands:
# p, pick <commit> = use commit
# r, reword <commit> = use commit, but edit the commit message
# e, edit <commit> = use commit, but stop for amending
# s, squash <commit> = use commit, but meld into previous commit
# f, fixup [-C | -c] <commit> = like "squash" but keep only the previous
#                    commit's log message, unless -C is used, in which case
#                    keep only this commit's message; -c is same as -C but
#                    opens the editor
# x, exec <command> = run command (the rest of the line) using shell
# b, break = stop here (continue rebase later with 'git rebase --continue')
# d, drop <commit> = remove commit
# l, label <label> = label current HEAD with a name
# t, reset <label> = reset HEAD to a label
# m, merge [-C <commit> | -c <commit>] <label> [# <oneline>]
# .       create a merge commit using the original merge commit's
# .       message (or the oneline, if no original merge commit was
# .       specified); use -c <commit> to reword the commit message
#
# These lines can be re-ordered; they are executed from top to bottom.
#
# If you remove a line here THAT COMMIT WILL BE LOST.
#
# However, if you remove everything, the rebase will be aborted.
注意:第一行 commit 無法使用 squash, 如果在第一行使用 squash 會出現類似下的錯誤訊息:
error: cannot 'squash' without a previous commit
You can fix this with 'git rebase --edit-todo' and then run 'git rebase --continue'.
Or you can abort the rebase with 'git rebase --abort'.
直接合併 commits
除了 squash 之外,也可以使用 fixup 合併 commits, 與 squash 不同的是, fixup 會直接採用上一個 commit 的 message 作為合併後的 commit message, 不需重新輸入 commit message:
pick a71bc5b feature/signup 1st commit
# ↓ 改為 fixup
fixup e94ab5e feature/signup 2nd commit

# Rebase 36abac1..e94ab5e onto 36abac1 (2 commands)
#
# Commands:
# p, pick <commit> = use commit
# r, reword <commit> = use commit, but edit the commit message
# e, edit <commit> = use commit, but stop for amending
# s, squash <commit> = use commit, but meld into previous commit
# f, fixup [-C | -c] <commit> = like "squash" but keep only the previous
#                    commit's log message, unless -C is used, in which case
#                    keep only this commit's message; -c is same as -C but
#                    opens the editor
# x, exec <command> = run command (the rest of the line) using shell
# b, break = stop here (continue rebase later with 'git rebase --continue')
# d, drop <commit> = remove commit
# l, label <label> = label current HEAD with a name
# t, reset <label> = reset HEAD to a label
# m, merge [-C <commit> | -c <commit>] <label> [# <oneline>]
# .       create a merge commit using the original merge commit's
# .       message (or the oneline, if no original merge commit was
# .       specified); use -c <commit> to reword the commit message
#
# These lines can be re-ordered; they are executed from top to bottom.
#
# If you remove a line here THAT COMMIT WILL BE LOST.
#
# However, if you remove everything, the rebase will be aborted.
以上就是 rebase 的幾個簡單說明與操作,至於 exec 就留給各位去體驗了!
Rebase 出現問題時的處理方法
Rebase 與 merge 一樣都可能會產生 conflict ,這時候除了修正 conflict 之後再用 git add <file> , git commit -m <message> , git rebase --continue 完成 rebase 之外,也可以用 git rebase --abort 直接放棄 rebase 。
$ git rebase (--continue | --abort | --skip)
此外,對於 rebase 使用不慎時,我們會希望能夠直接回復到 rebase 之前的狀態,以下就是幾個指令可以用來回復到 rebase之前的狀態(參考自 StackOverFlow )。
回復方法 1 (最簡單的用法):
$ git reset --hard ORIG_HEAD
回復方法 2. rebase 之前先上 tag :
$ git tag BACKUP
$ ... # rebase 過程
$ ... # rebase 過程
$ git reset --hard BACKUP # 失敗的話可以直接回復到 tag BACKUP
回復方法 3 :
$ git reflog # 尋找要回復的 HEAD ,以下假設是 HEAD@{3}
$ git reset --hard HEAD@{3} # 回復
總結
實務上,如果想維持 commit 的整潔, rebase 幾乎是必要的,只是在使用 rebase 時一定要了解其特性,否則就容易造成其他人的困擾。
以上, Happy Coding!